How To Articles
by Dimitri Munkirs of WindJack Solutions.
Copyright
© 2005
by WindJack Solutions, Inc
How to Use AcroButtons to Turn Any
Acrobat Menu Item Into a One-Click Toolbar Button


Introduction
This article will show you step by step
how to use AcroButtons to turn any Acrobat Menu Item into a useful one-click toolbar
button.† Why would you want to do this?† How is this helpful?† Here are two good reasons-
- Provides
end users who are not well versed with Acrobat, but who need to use it for
your work-flow, with a highly visible one-click
option to perform something that otherwise might require them to hunt
through multi levels of menus in Acrobat.
- Do you
routinely use Menu item options in Acrobat?† Tired of walking that
menu every day?† Turning
those Menu items into toolbar buttons gives you one-click access- a
valuable time saver.
- Toolbar
buttons you create with AcroButtons can be passed out
to anyone- your work-group, clients, etc.†
End users donít have to own the
AcroButtons tool to use the function you create with it.
This article has two parts.†
The first part shows you step by step how to use AcroButtons to create a
Menu Item report- this is a list of all Menu Items available
in the version of Acrobat you are using.†
This report is handy to have since some of the Menu Item names in
Acrobat are not the same as the name used for it in Acrobat JavaScript
code.† An example of this is the ìSearchî
menu item.† The underlying name for
search used for JavaScript coding is ìFindî not Search.
Creating a
Menu Item Report with AcroButtons
1.
Start
by clicking the†  ††symbol to create a new toolbar button.† Enter a name for your new button (no spaces
allowed) and choose an image for it.†
Details on image selection can be found in the AcroButtonís Userís
Manual or in the step-by-step guide for toolbar button
creation ìAcroButtons Quick Start Guide.î
††symbol to create a new toolbar button.† Enter a name for your new button (no spaces
allowed) and choose an image for it.†
Details on image selection can be found in the AcroButtonís Userís
Manual or in the step-by-step guide for toolbar button
creation ìAcroButtons Quick Start Guide.î
NOTE: If this
button will be used in Acrobat 7 you may also wish to
add a text label for your toolbar button by entering it in the Label area. †Figure 1. below shows the
Label as ìMenu Item Report.î
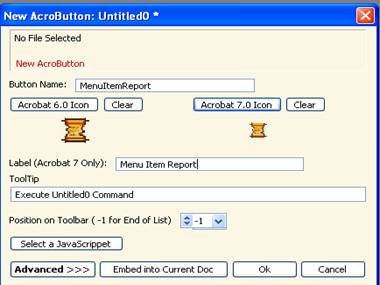
Figure 1.† This screen shot shows the first steps in
creating a new toolbar button- naming the button, selecting the image, and
choosing a Label for Acrobat 7 users.
2.
Click
the ìSelect a JavaScrippetî button.†
Choose Tools -> Create
Menu/Button Report as shown below in Figure 2.
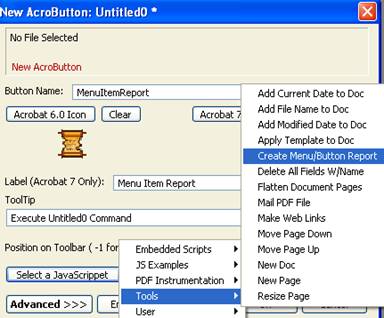
Figure2. Select
the JavaScrippet for creating a Menu Item Report
3.
The
JavaScrippet Pre-Viewer window will appear.†
Leave all settings at their default values and click Use This Scrippet.
4.
AcroButtons
gives you the option to have your toolbar button always enabled or only enabled
when a PDF document is open.† Letís set our button to always be enabled.† Click on the Advanced button.† The window
will expand to show all of the advanced features available in AcroButtons.† For this example weíll just make use of the
ìAlways Enabledî feature by selecting that option as shown in Fig. 3
NOTE:† Fig.3 also shows a check box option to set
this main dialog to open with the Advanced features expanded all the time
(bottom left corner) - a handy box to check if you regularly use the Advanced
features.
Figure3. Setting the Enable Function to Always
5.
Click
Save.
6.
Enter
a file name in the dialog Select a File
to Store the AcroButton In or use the default which
is the name chosen for the button in Step 1 (in this case, MenuItemReport).
7.
Click
Save.† Click Close.
8.
Your
new button is now on the Acrobat Add-ons toolbar.† If you do not have the Add-ons toolbar
activated do so now. Acrobat -> View -> Toolbars ->
Add-on Tools.
9.
Fig.
4 shows the new Menu Item Report toolbar button in Acrobat 6 (Acrobat 7 toolbar
not shown).†
Figure4.† New Menu Item Report toolbar button in
Acrobat 6
10.
Click on
the new toolbar button.† Choose Menu Item
Report in the dialog that appears.† The
script creates a new PDF document and fills it with a report of all Acrobat
Menu Items (Fig. 5).† This report can be saved or printed like any other PDF, or re-generated any
time you want by just one-click on your new toolbar button.
Figure5.† Menu Item Report for Acrobat 6.02
Professional
Creating a
Toolbar Button for Any Acrobat Menu Item of Your Choice
Now that we have the Menu Item Report letís
pick something from the list to make into a one-click toolbar button.† As you can see there
are hundreds of Menu Items in Acrobat.†
For this example Iíll use the Go To Previous
Page command.† Figure 1 shows this in the
list of commands from the Menu Item Report.†
Notice the ** denotes the actual name of the command- so the command for
GoTo PrevPage is ìPrevPageî not GoTo PrevPage.
Figure
1.† Section of the Acrobat Menu
Item Report
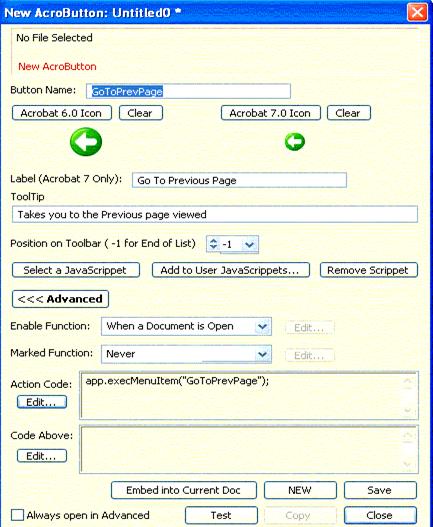
1.
Click
the† †††symbol for creating a new button.† As in Part 1, give
the button a name, choose an image for the button (I used the Quick Select
option and chose one of the images included with AcroButtons), enter a Label if
working with Acrobat 7, and give your button a custom Tool Tip if you
wish.† Figure 2.† shows how this dialog box should look.
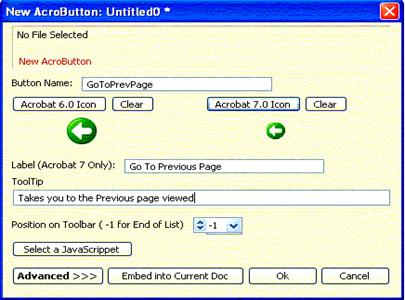
Figure
2.† Setting up
the button file.
2.
Click
the Advanced button.† Youíve seen this
from Part 1 but here we are going to enter our own line of code instead of
choosing one of the included JavaScrippets.
3.
The
JavaScript code for creating a Menu item is a simple one-liner-
app.execMenuItem("name
of menu item")
All we need to do to make this
line of code work for our GoTo PrevPage is to replace the ìname of menu itemî
with the actual menu item name we want- in our case this will result in
app.execMenuItem("PrevPage");
4.
Click
the button labeled Action Code Edit to
access the action code entry dialog box.† Enter the line of code as shown below in Fig
3.
Figure
3.† Entered code
in the Action Code dialog box.
5.
Click
OK.† You have now set up all the
parameters for your new toolbar button.†
The dialog box should look like the one below in Fig 4.
6.
Click
Save and enter a File Name.† This file is
the one you would hand out to other users you want to have this one-click
functionality.† The new GoTo PrevPage
button is now on the Acrobat Add-ons toolbar.†
With one click, you can go to the previous page in any multi-page
document open in Acrobat.† Remember too-
you can also move this file to Reader and it will work there as well.
Thatís it on how to create toolbar
buttons for any Menu Item in Acrobat using AcroButtons.† Pretty simple isnít it?† Yet this simple act gives you the power to
automate those pesky menu- walking tasks you do all
the time, or lets you pass these buttons out to your co-workers who can never
remember where that darn Menu item is at.
More How To articles for AcroButtons to come- if you have a
topic you would like covered please let us know.† And, if you have any
input on this article Iíd love to hear from you (just remember- Iím no
programmer!)
Dimitri Munkirs
WindJack Solutions, Inc.
